Exit Node Setup Guide
BelNet Exit Node Setup Guide
System Requirements
Below are the system requirements and the minimum specifications of dedicated server or VPS
| S.No | Spec | Note |
|---|---|---|
| 1 | CPU Cores | 2 or more |
| 2 | RAM | 4 GB |
| 3 | Storage | 40 GB SSD |
| 4 | Software | Ubuntu 18.04 or 20.04 |
| 5 | Higher Bandwidth | At least 1 GB preferable |
*Note: You need a Linux system to run exit nodes.
Step Install BelNet on your VPS
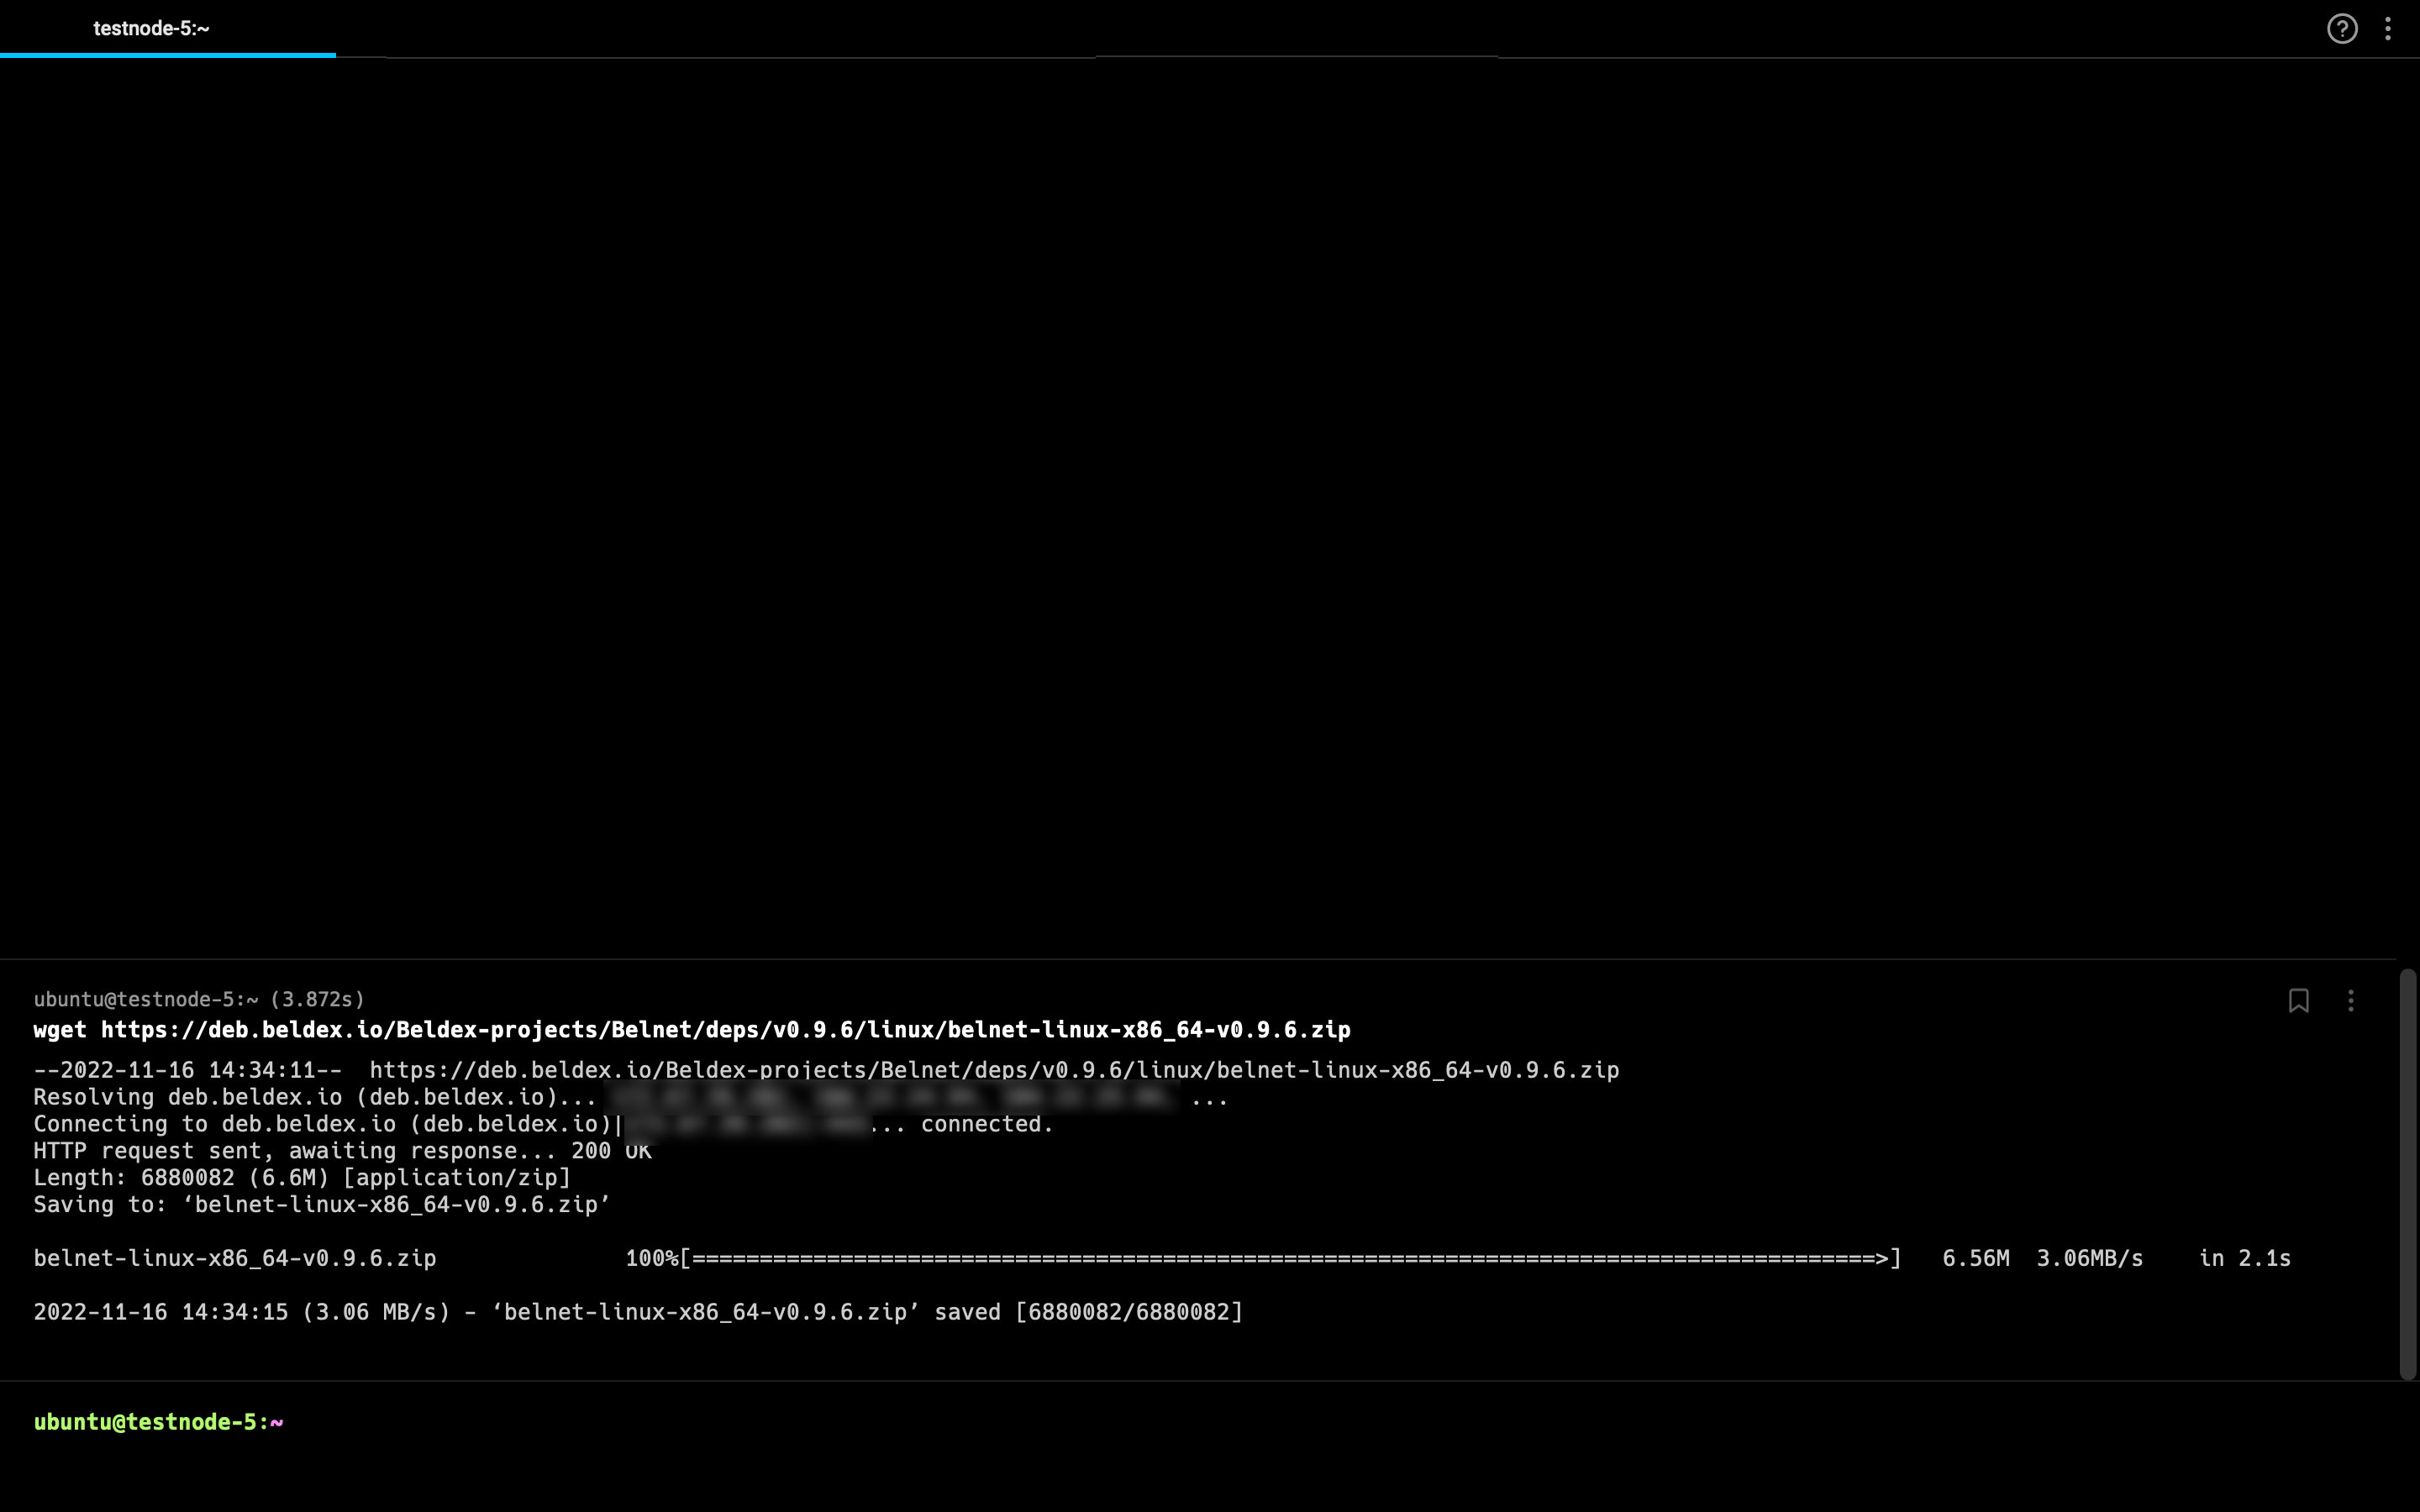
Copy and paste the following link into the terminal
This will download the Belnet binaries from cloud
wget
                        https://deb.beldex.io/Beldex-projects/Belnet/deps/v0.9.7/linux/belnet-linux-x86_64-v0.9.7.zip
Unzip the file using the following command
unzip belnet-linux-x86_64-v0.9.7.zip
Execution
- Install vim editor using the following command
-
sudo apt install vim - Install tmux in your system
-
sudo apt install tmux - Create a tmux session
-
tmux new -s belnet - Run the Belnet binary
-
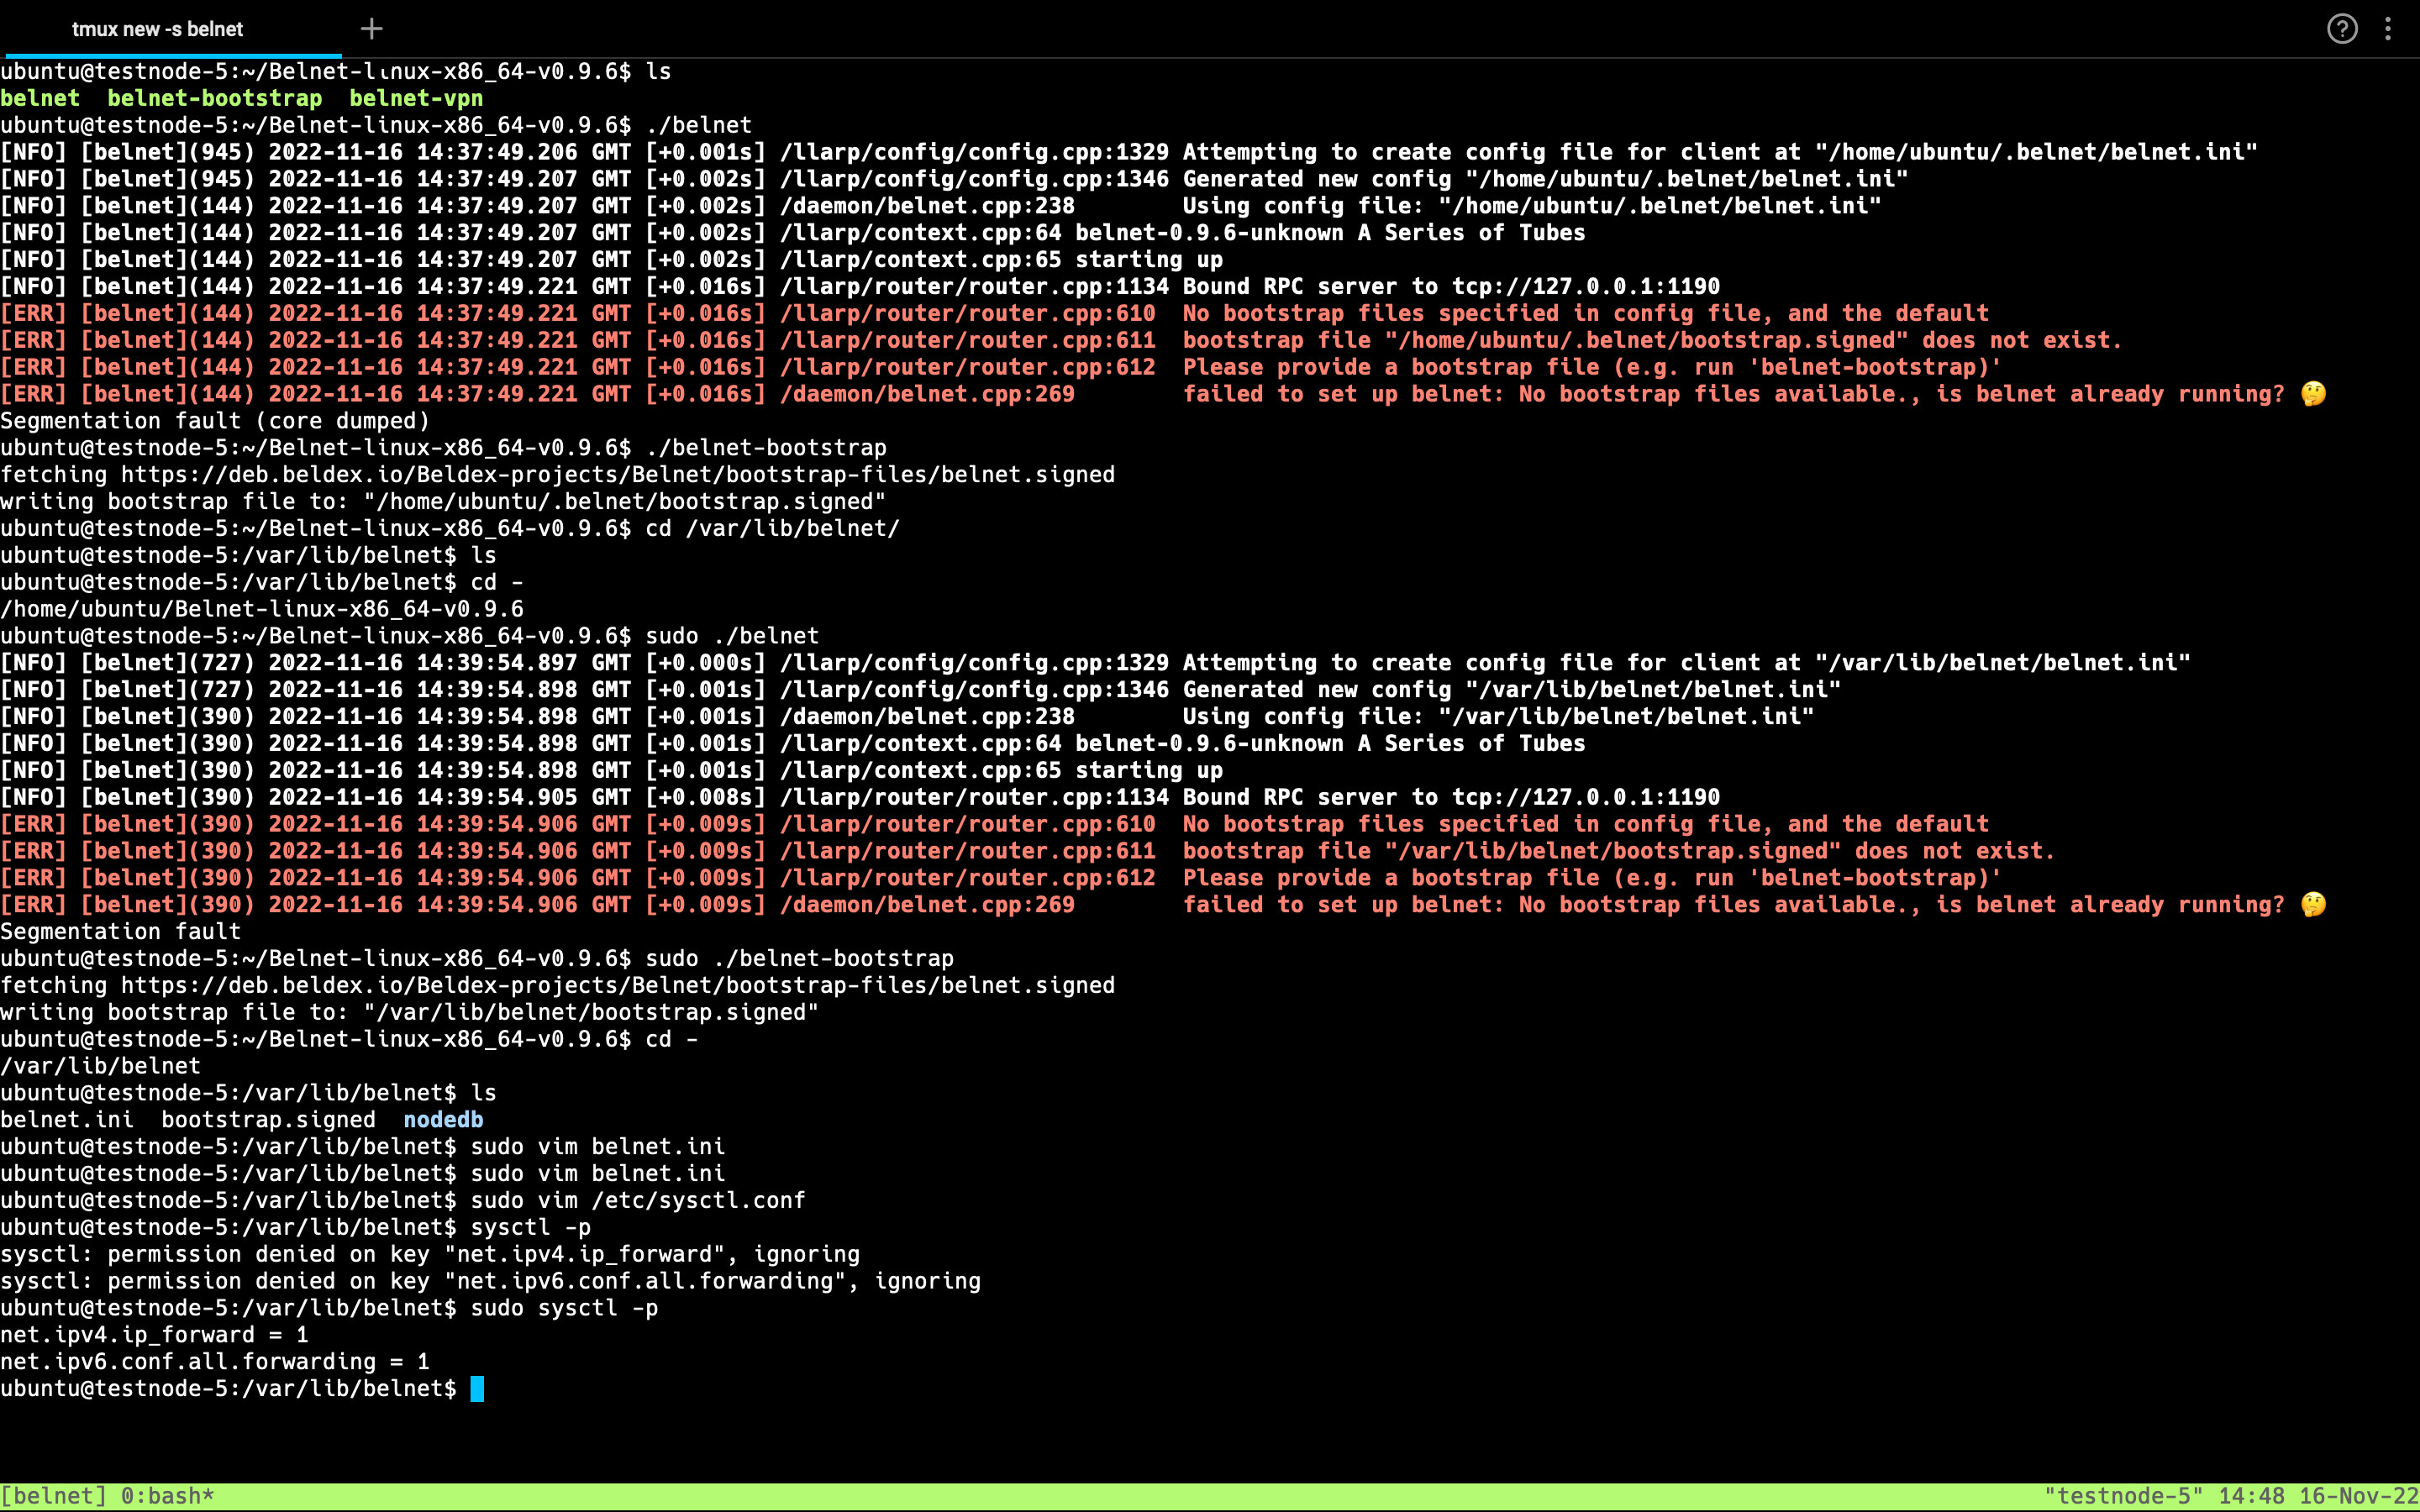
sudo ./belnet - Download the bootstrap file using belnet-bootstrap
-
sudo ./belnet-bootstrap
Step Configure Belnet.ini using vim
Go to Belnet config directory
cd /var/lib/belnet/
Edit the belnet.ini file by entering the following command
vim belnet.ini
Add the following lines under the [router] section or uncomment the following by removing the #.
This will configure the number of connections that an exit node can maintain.
netid = belnet
worker-threads=0 (It uses all threads)
min-connections=18
max-connections=20
Add the following lines under the [network] section or uncomment the following by removing the #.
keyfile=/var/lib/belnet/exit.private
ifaddr=10.0.0.1/16
ifname=exit0
hops=2
paths=8
exit=true

Step Enable IP Forwarding via ''sysctl''
Open the following folder
sudo vim /etc/sysctl.conf
Add the following lines. This will allow IP forwarding for both IPV4 and IPV6
net.ipv4.ip_forward=1
net.ipv6.conf.all.forwarding=1
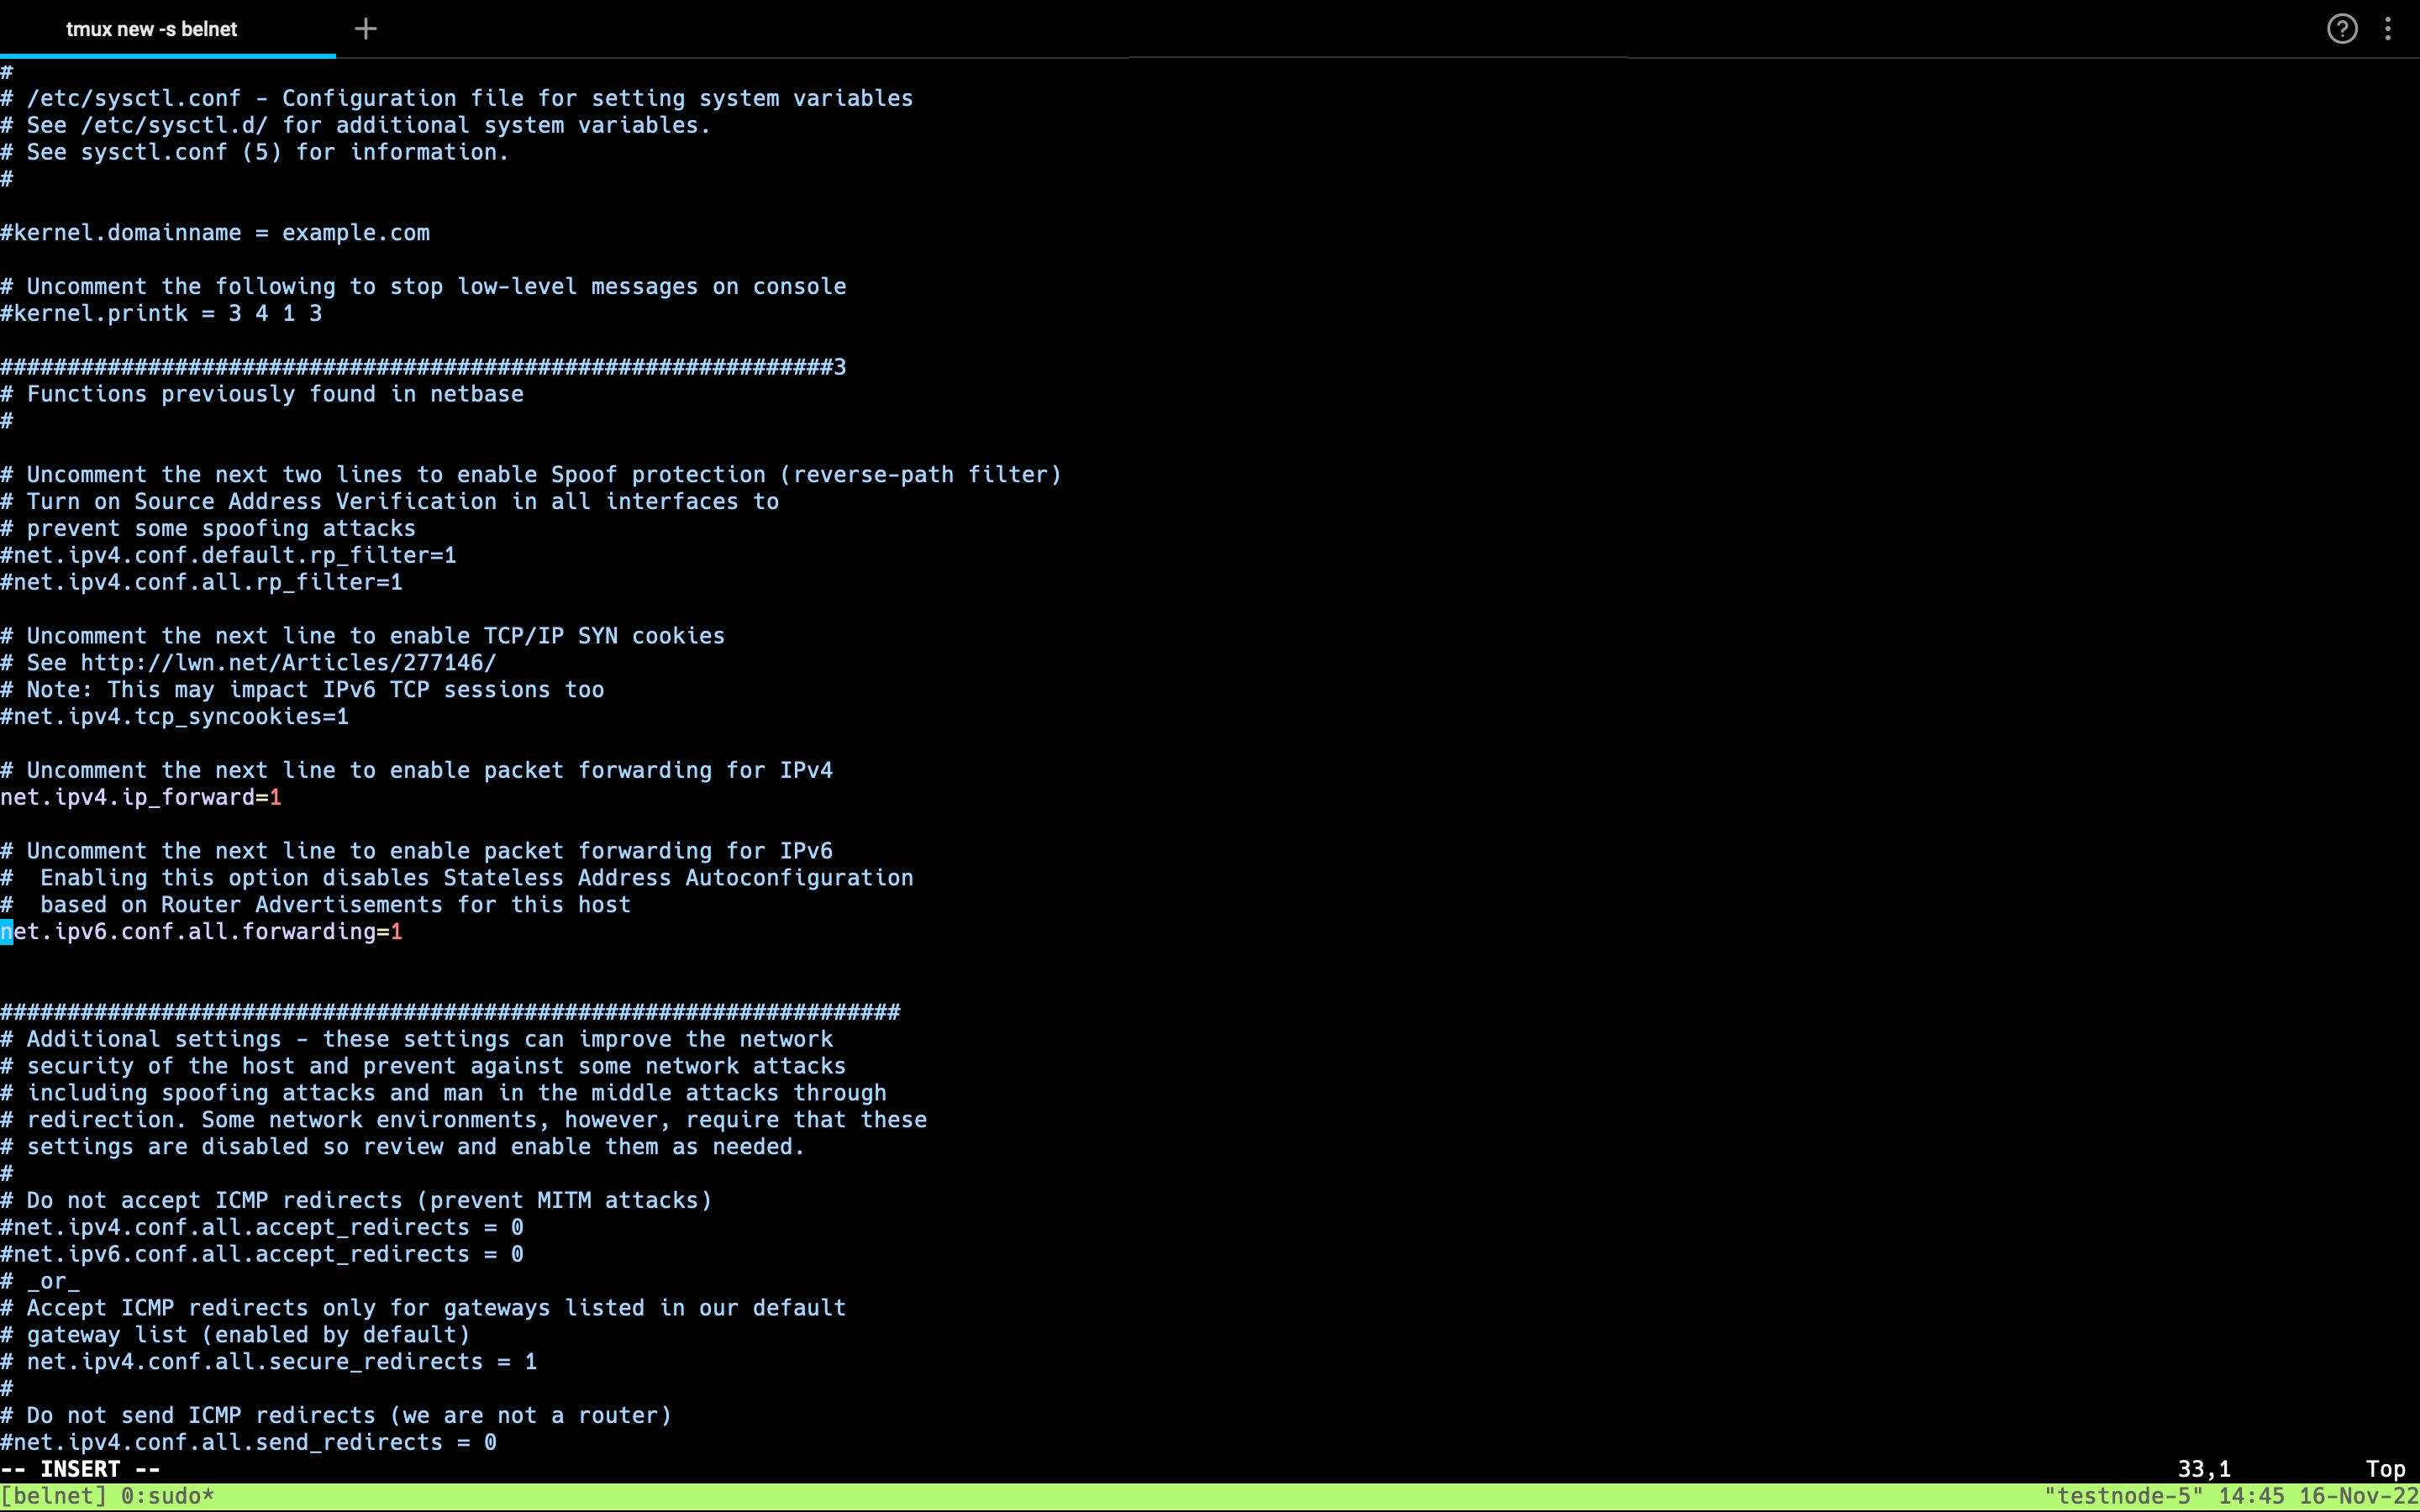
Press ESC + :wq to save and exit to /etc/sysctl.conf
Enable the changes using the following command
sysctl -p
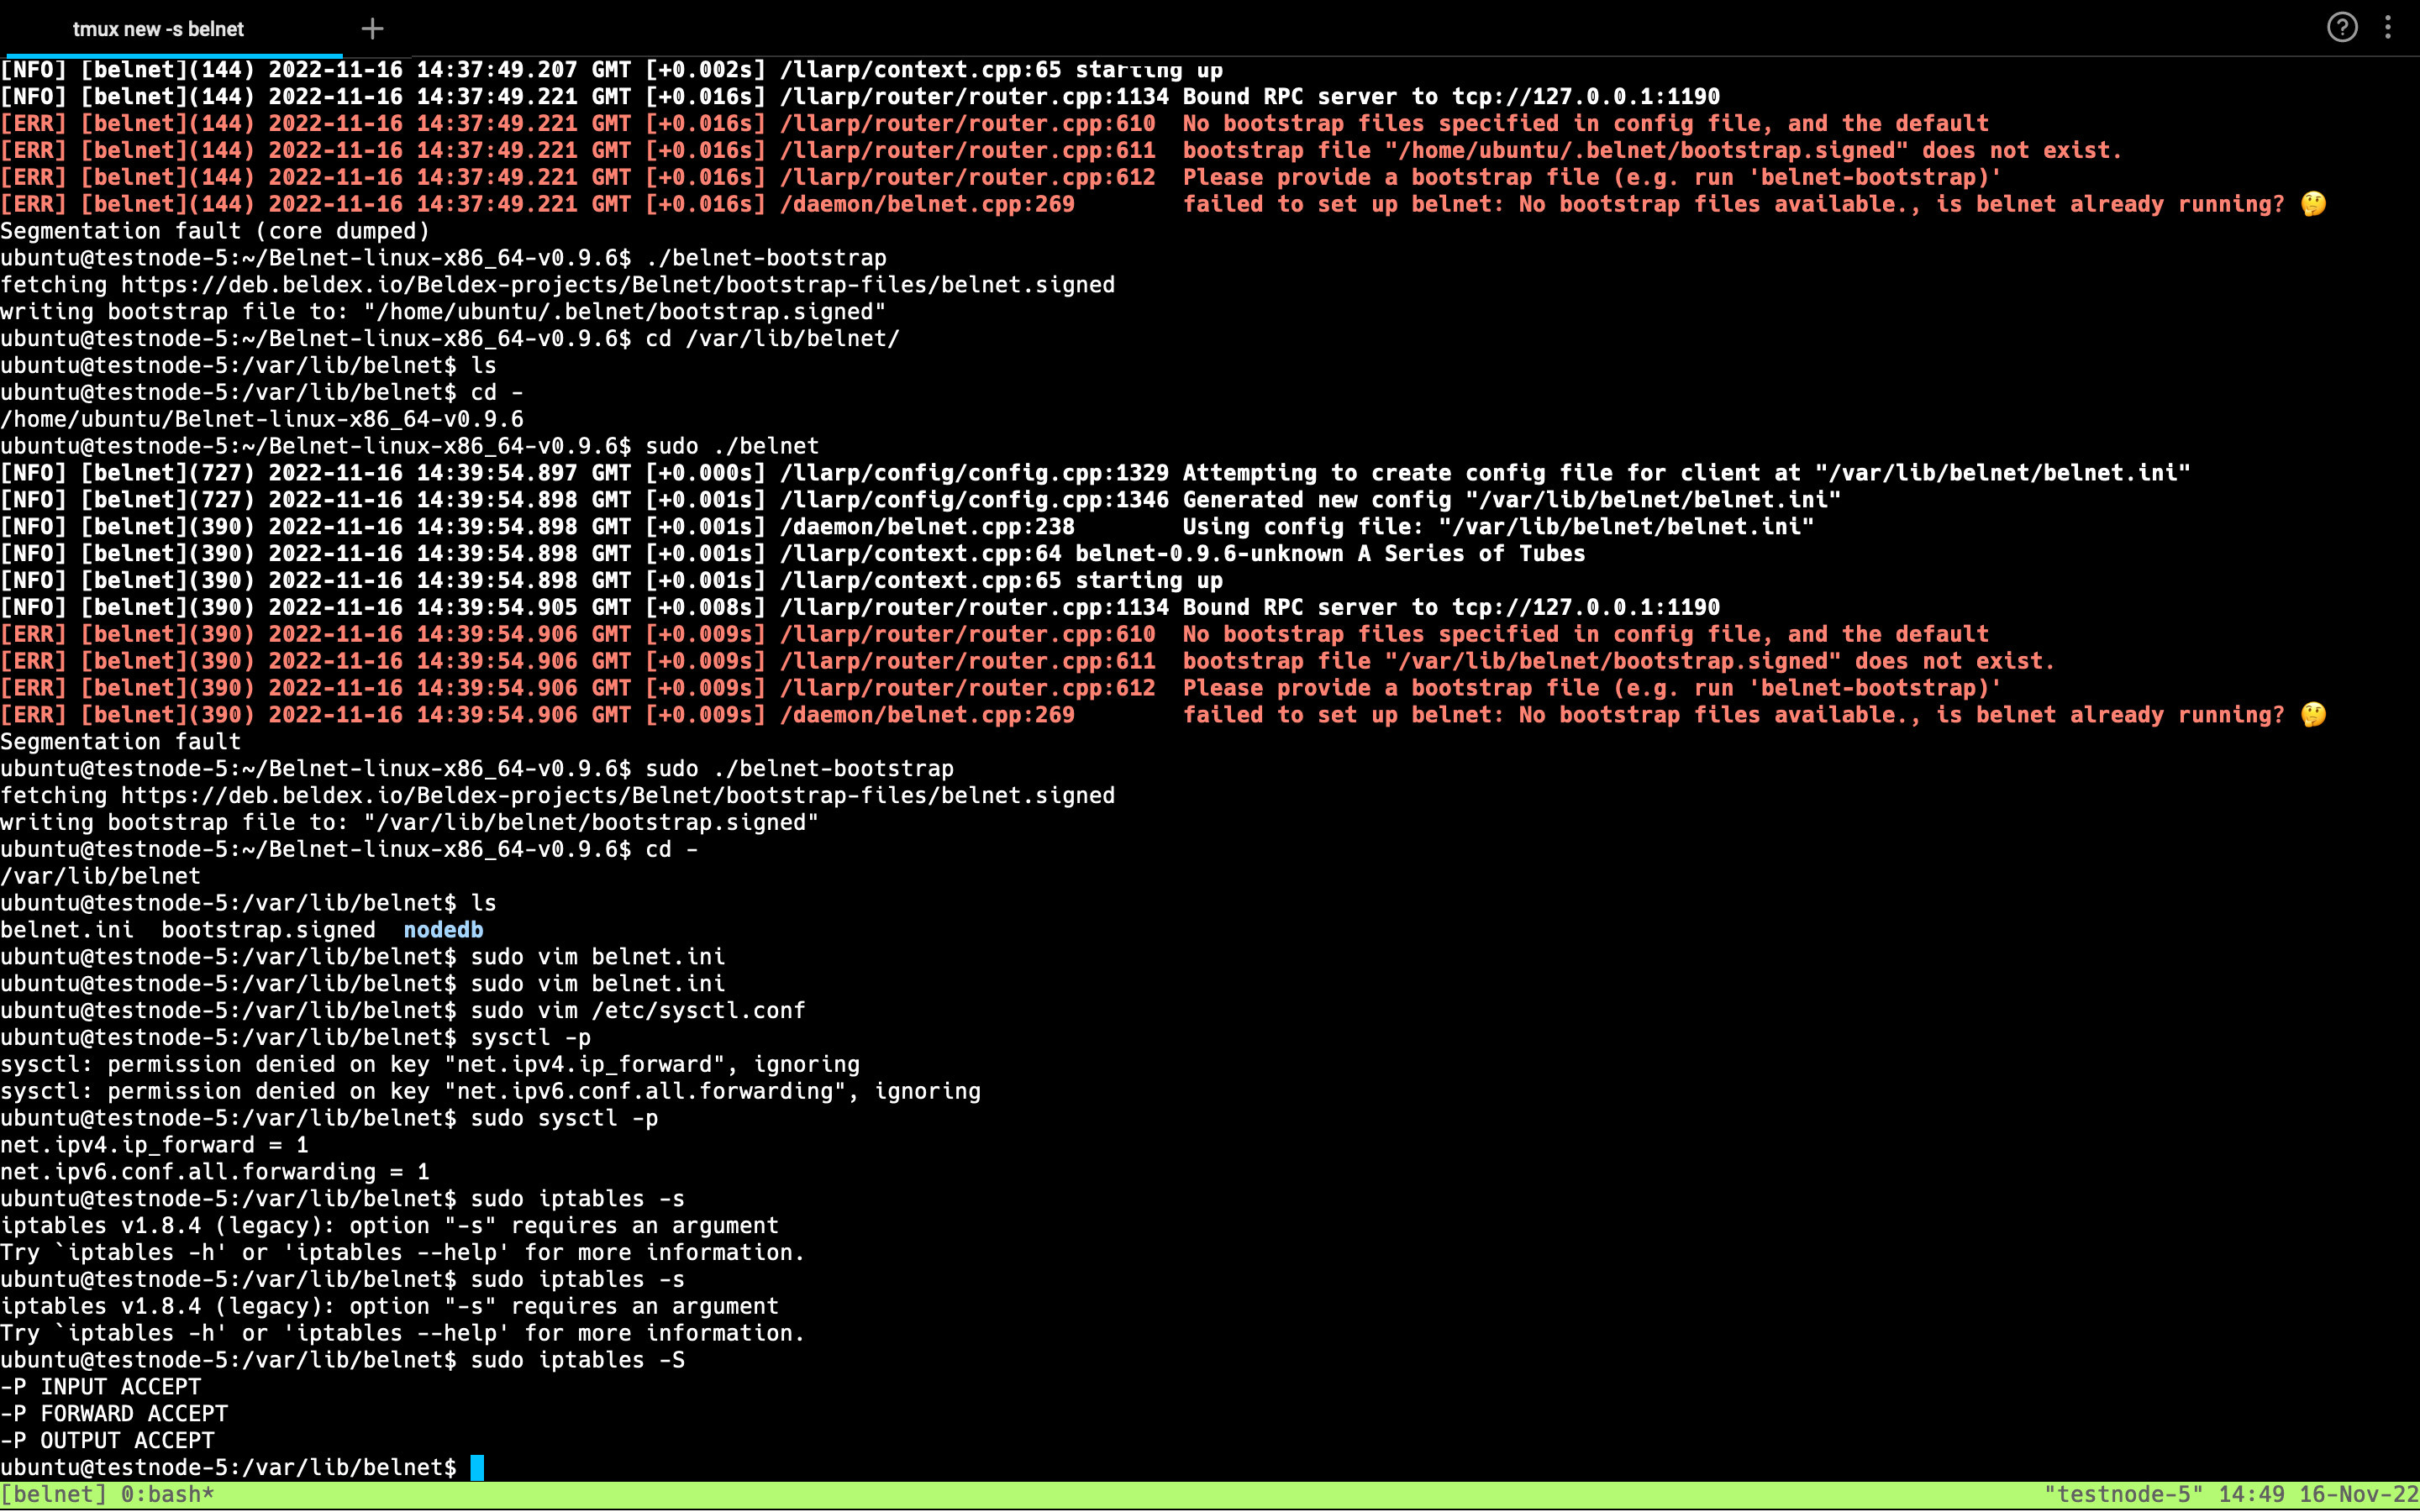
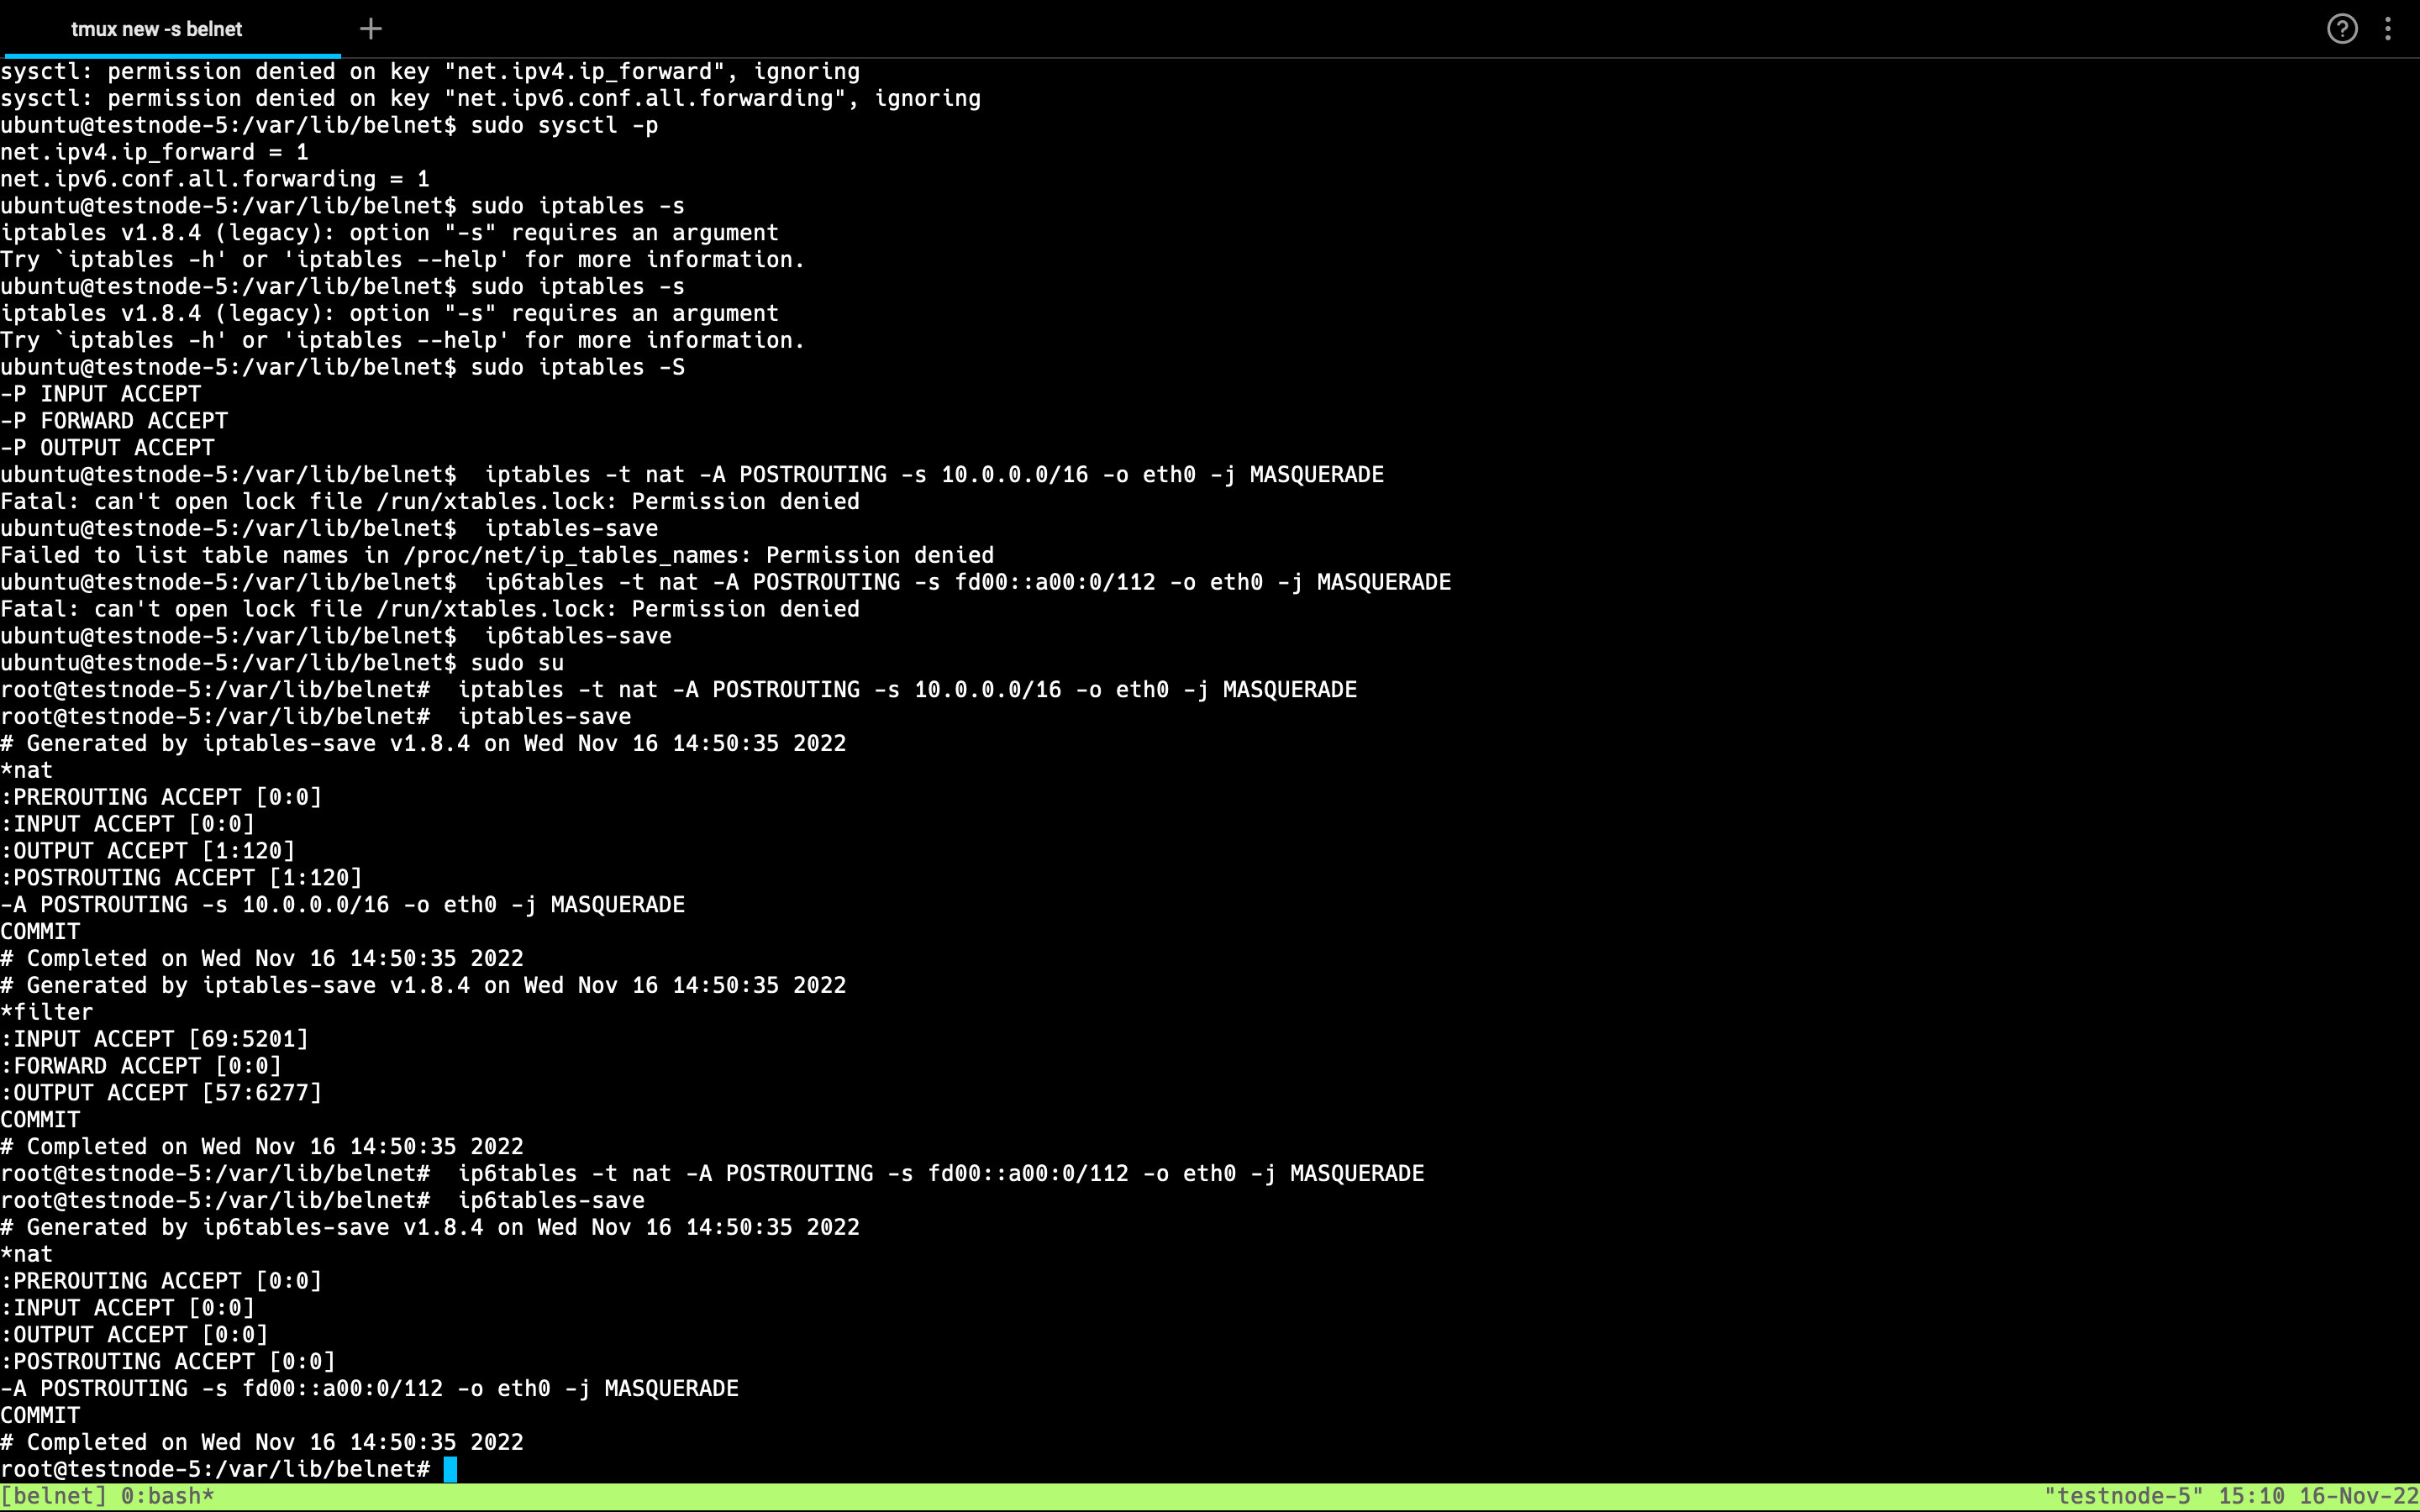
Step Setup firewall
Please check firewall status using the following command
iptables -S
Default result should return the following:-
-P INPUT ACCEPT
-P FORWARD ACCEPT
-P OUTPUT ACCEPT
Add firewall rules for IPv4
Copy and paste the following commands
iptables -t nat -A POSTROUTING -s 10.0.0.0/16 -o eth0
                        -j MASQUERADE
iptables-save
ip6tables -t nat -A POSTROUTING -s fd00::a00:0/112 -o
                        eth0 -j MASQUERADE
ip6tables-save
Add route for Belnet interface's IPv6
ip -6 route add fd00::a00:0/112 dev exit0
It is beneficial to block ports for Simple Mail Transfer Protocol (SMTP), SMTP over Secure Sockets Layer (SSL), SMTP over Transport Layer Security (TLS), Internet Relay Chat (IRC) and IRC over SSL. This is non-mandatory but may protect your exit node from Distributed Denial Of Service (DDOS) attacks. For more details, kindly check with your VPS host.
for port in 25 465 587 666{0,1,2,3,4,5,6,7} 6697;
iptables -A FORWARD -s 10.0.0.0/16 -p tcp -m tcp
                        --dport $port -j REJECT --reject-with tcp-reset
ip6tables -A FORWARD -s fd00::a00:0/112 -p tcp -m tcp
                        --dport $port -j REJECT --reject-with tcp-reset
Now it is completed
iptables-save
ip6tables-save

That above commands unroll to:
iptables -A FORWARD -s 10.0.0.0/16 -p tcp -m tcp
                        --dport 25 -j REJECT --reject-with tcp-reset
iptables -A FORWARD -s 10.0.0.0/16 -p tcp -m tcp
                        --dport 465 -j REJECT --reject-with tcp-reset
iptables -A FORWARD -s 10.0.0.0/16 -p tcp -m tcp
                        --dport 587 -j REJECT --reject-with tcp-reset
                        iptables -A FORWARD -s 10.0.0.0/16 -p tcp -m tcp --dport
                        6660 -j REJECT --reject-with tcp-reset
                        iptables -A FORWARD -s 10.0.0.0/16 -p tcp -m tcp --dport
                        6661 -j REJECT --reject-with tcp-reset
                        iptables -A FORWARD -s 10.0.0.0/16 -p tcp -m tcp --dport
                        6662 -j REJECT --reject-with tcp-reset
                        iptables -A FORWARD -s 10.0.0.0/16 -p tcp -m tcp --dport
                        6663 -j REJECT --reject-with tcp-reset
                        iptables -A FORWARD -s 10.0.0.0/16 -p tcp -m tcp --dport
                        6664 -j REJECT --reject-with tcp-reset
                        iptables -A FORWARD -s 10.0.0.0/16 -p tcp -m tcp --dport
                        6665 -j REJECT --reject-with tcp-reset
                        iptables -A FORWARD -s 10.0.0.0/16 -p tcp -m tcp --dport
                        6666 -j REJECT --reject-with tcp-reset
                        iptables -A FORWARD -s 10.0.0.0/16 -p tcp -m tcp --dport
                        6667 -j REJECT --reject-with tcp-reset
iptables -A FORWARD -s 10.0.0.0/16 -p tcp -m tcp
                        --dport 6697 -j REJECT --reject-with tcp-reset
iptables-save
ip6tables -A FORWARD -s fd00::a00:0/112 -p tcp -m tcp
                        --dport 25 -j REJECT --reject-with tcp-reset
ip6tables -A FORWARD -s fd00::a00:0/112 -p tcp -m tcp
                        --dport 465 -j REJECT --reject-with tcp-reset
ip6tables -A FORWARD -s fd00::a00:0/112 -p tcp -m tcp
                        --dport 587 -j REJECT --reject-with tcp-reset
ip6tables -A FORWARD -s fd00::a00:0/112 -p tcp -m tcp
                        --dport 6660 -j REJECT --reject-with tcp-reset
ip6tables -A FORWARD -s fd00::a00:0/112 -p tcp -m tcp
                        --dport 6661 -j REJECT --reject-with tcp-reset
ip6tables -A FORWARD -s fd00::a00:0/112 -p tcp -m tcp
                        --dport 6662 -j REJECT --reject-with tcp-reset
ip6tables -A FORWARD -s fd00::a00:0/112 -p tcp -m tcp
                        --dport 6663 -j REJECT --reject-with tcp-reset
ip6tables -A FORWARD -s fd00::a00:0/112 -p tcp -m tcp
                        --dport 6664 -j REJECT --reject-with tcp-reset
ip6tables -A FORWARD -s fd00::a00:0/112 -p tcp -m tcp
                        --dport 6665 -j REJECT --reject-with tcp-reset
ip6tables -A FORWARD -s fd00::a00:0/112 -p tcp -m tcp
                        --dport 6666 -j REJECT --reject-with tcp-reset
ip6tables -A FORWARD -s fd00::a00:0/112 -p tcp -m tcp
                        --dport 6667 -j REJECT --reject-with tcp-reset
ip6tables -A FORWARD -s fd00::a00:0/112 -p tcp -m tcp
                        --dport 6697 -j REJECT --reject-with tcp-reset
ip6tables-save
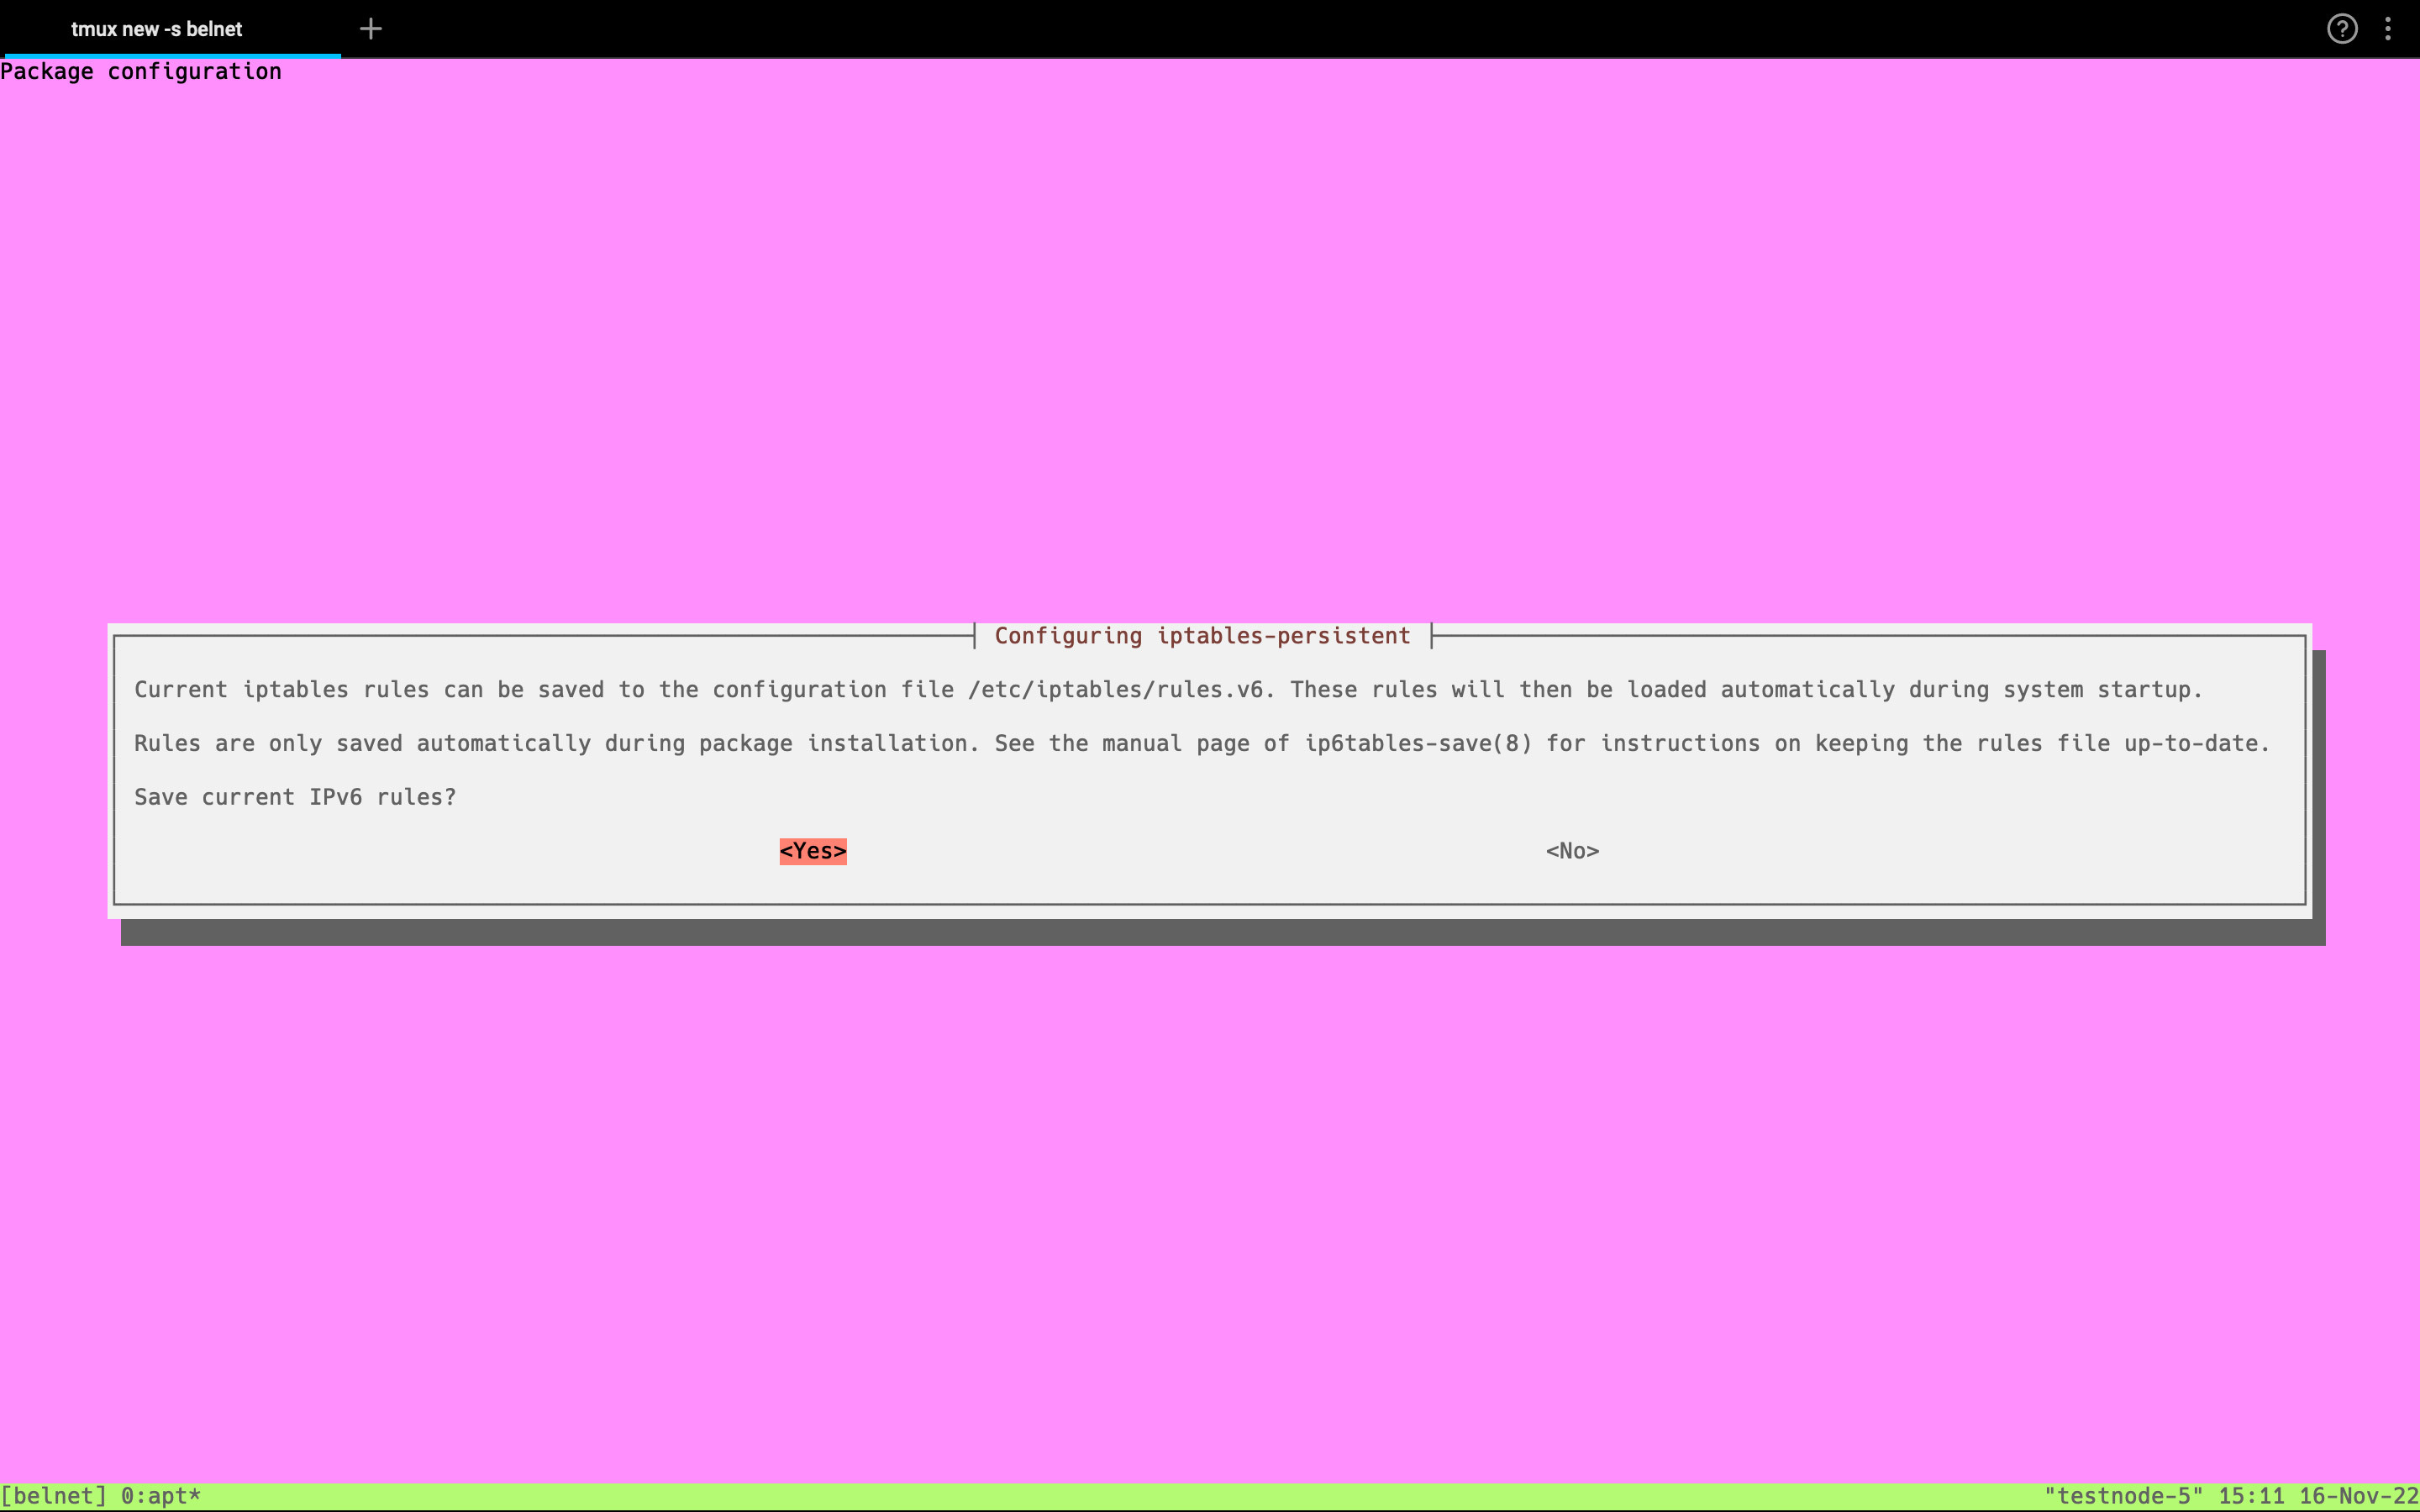
Make firewall settings persistent after rebooting system by using the command given below
apt install iptables-persistent
Select Yes on the pop-up window to save current rules to install both for IPv4 and IPv6.
Run Belnet
sudo ./belnet
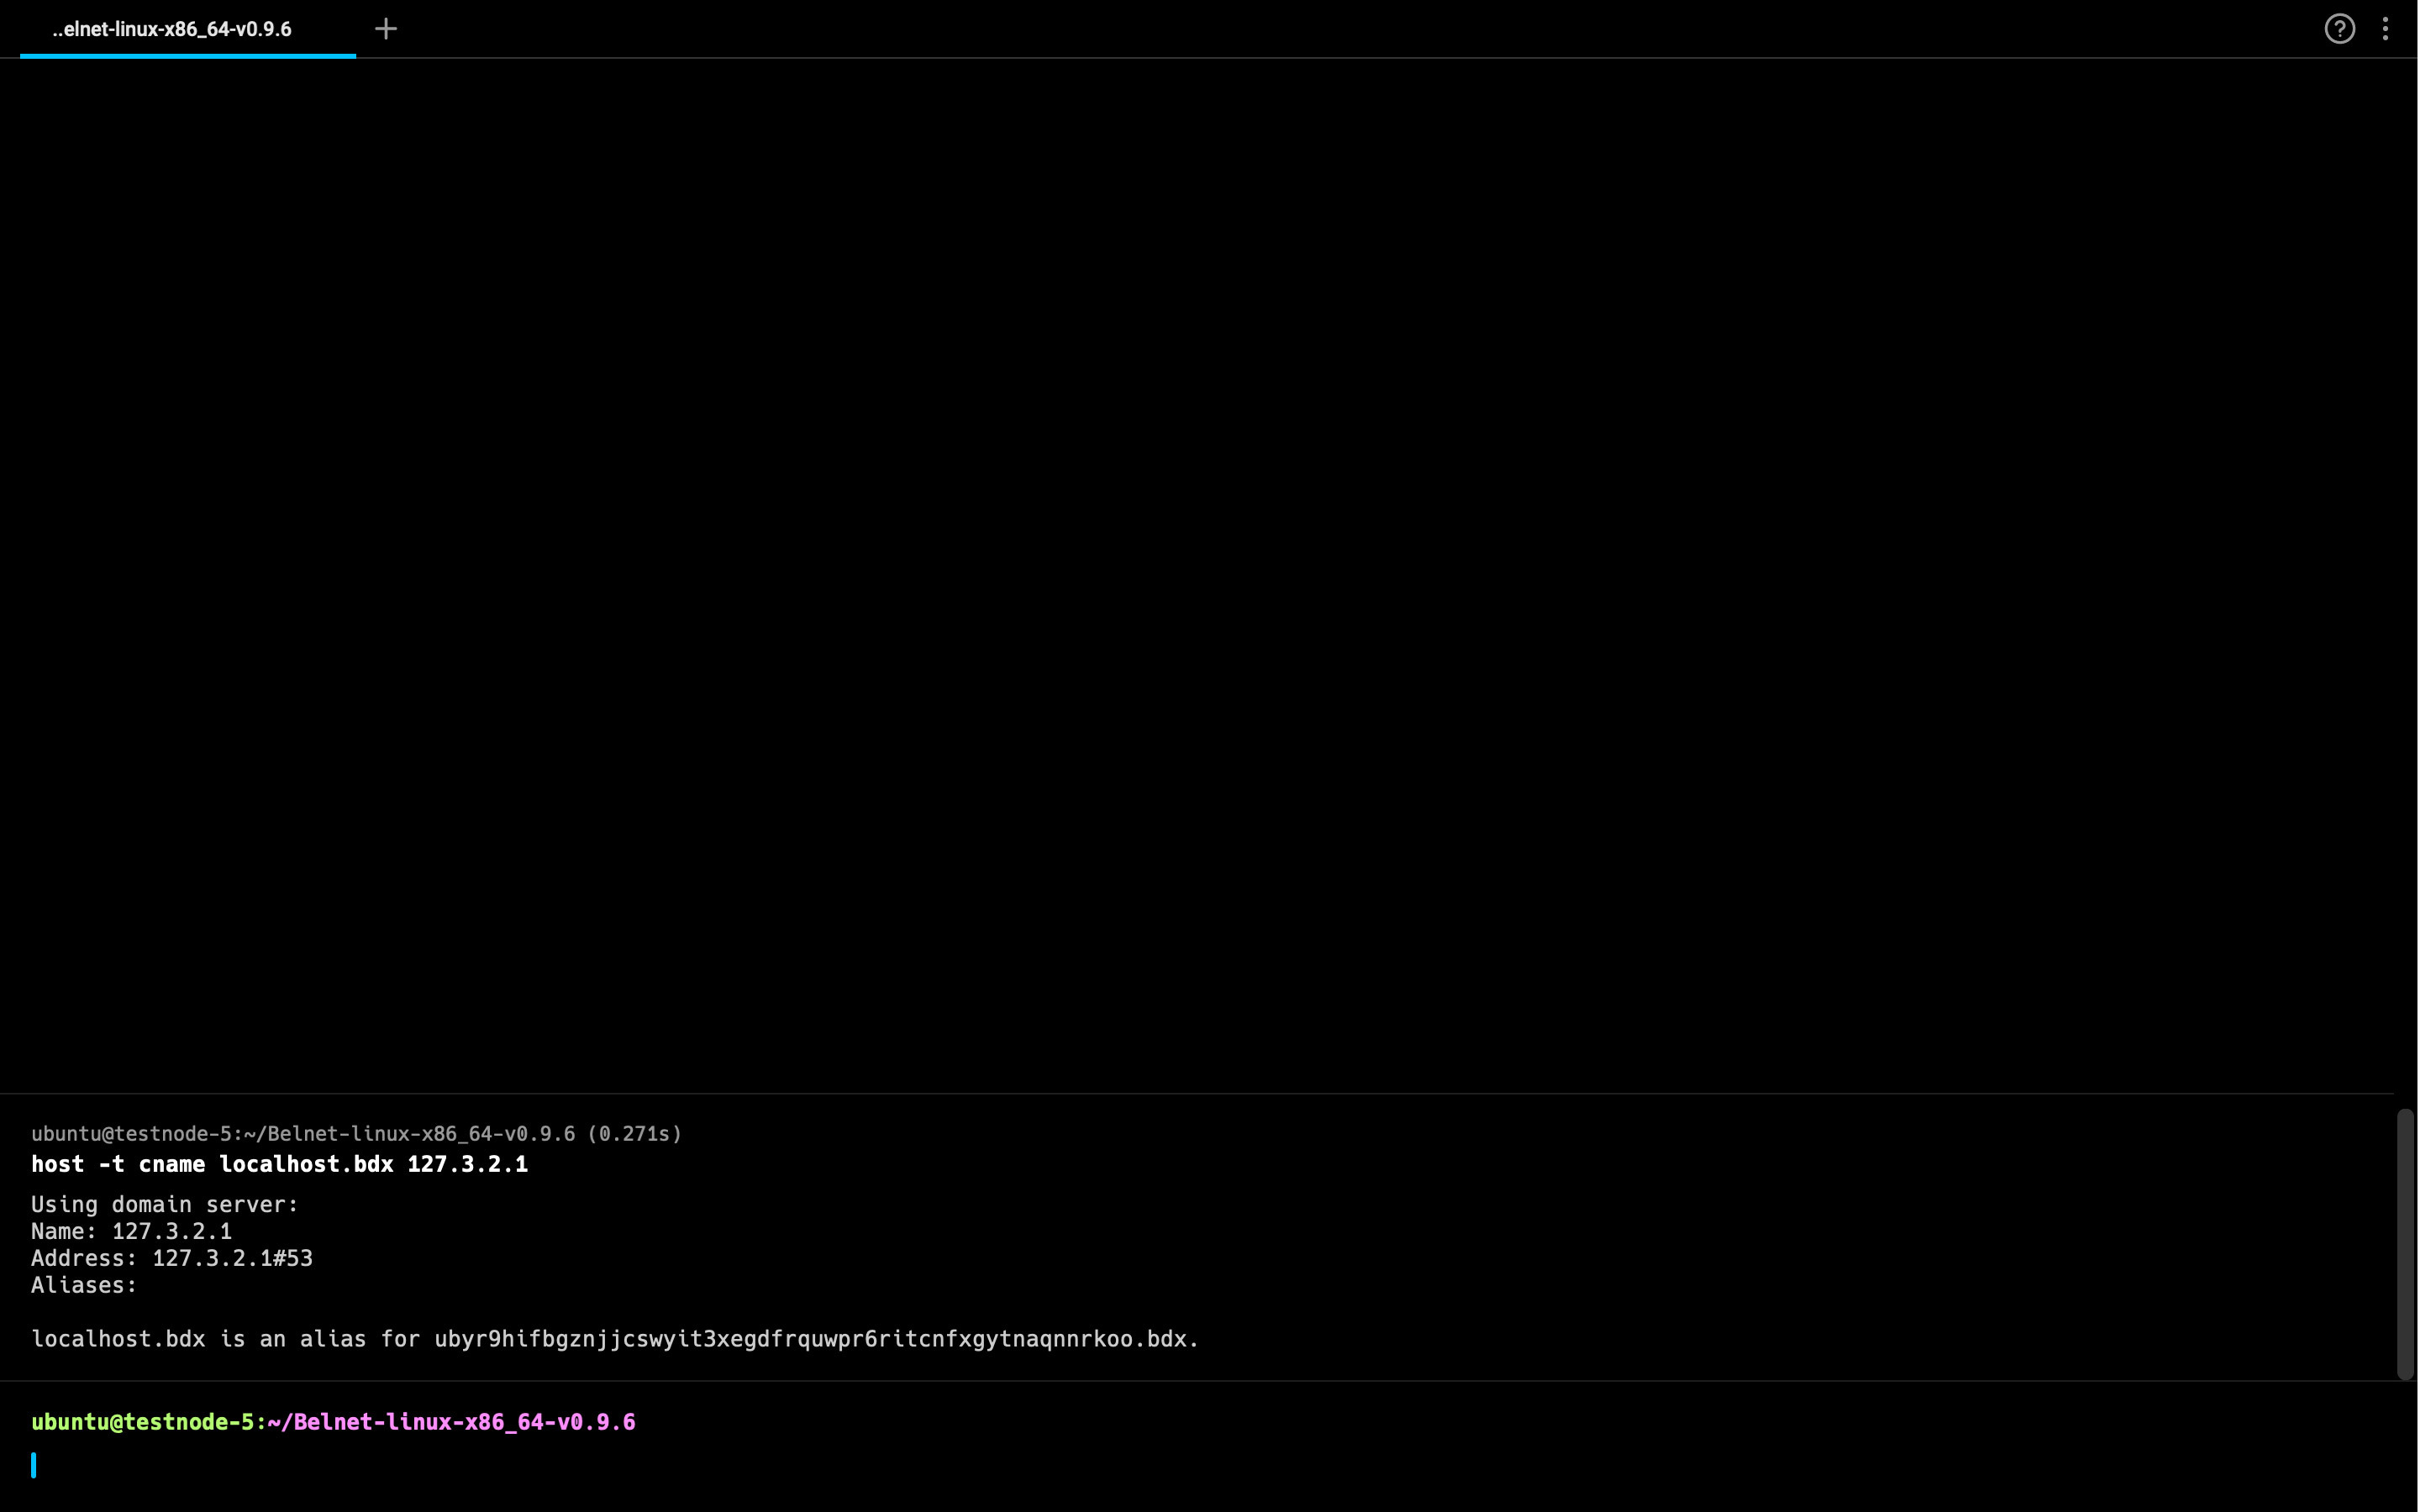
Step Fetch your permanent .bdx address :
apt install iptables-persistent
host -t cname localhost.bdx 127.3.2.1
To check if your exit node is publicly hosted, enter the following command
nslookup .bdx address
Step If you face any errors, you can troubleshoot your DNS using the following command
sudo vim /etc/resolv.conf
Please add the following nameserver in the file
nameserver 127.3.2.1
Save and exit the file using the ESC + :wq
Exit Node Setup Using BelNet Docker
Step Install Docker and Docker-Compose
Docker and docker-compose are prerequisites to download and run the docker images and container
Enter the following commands to download and install docker.
sudo apt update && sudo apt install apt-transport-https
                        ca-certificates curl software-properties-common -y &&
                        curl -fsSL https://download.docker.com/linux/ubuntu/gpg
                        | sudo apt-key add - && sudo add-apt-repository "deb
                        [arch=amd64] https://download.docker.com/linux/ubuntu
                        focal stable" && sudo apt update && sudo apt install
                        docker-ce -y && sudo systemctl status docker
Enter the following commands to download and install docker-compose.
sudo curl -L "
                        https://github.com/docker/compose/releases/download/1.28.5/docker-compose-$(uname
                        -s)-$(uname -m)" -o /usr/local/bin/docker-compose &&
                        sudo chmod +x /usr/local/bin/docker-compose &&
                        docker-compose --version
Step Pull the Image From Docker Hub
Enter the following command into the terminal to pull the BelNet Exit Node image from the docker hub.
docker pull beldex/belnet-exitnode:v2
Step Download & Compose yml File
Enter the following command to get the BelNet yml file from Beldex deb.
sudo apt install wget && wget
                        https://deb.beldex.io/Beldex-projects/Belnet/docker-compose.yml
Step To Run Container
Enter the following command to run the yml file as a container.
docker-compose up -d
Step Login into Container
Enter the following command to get the container ID and other details.
docker ps
Enter the following command after replacing your container ID in place of <container -id>
docker exec -it <container -id> bash
Step To View Exit Node Address
Your exit node is now live. Get your exit node's BelNet address using the following command.
host -t cname localhost.bdx 127.3.2.1